BrightSign Player installation
BrightSign device management — including player activation, setup configuration, and app installation — is completed through BSN.Cloud.
Prerequisites
- Bright Sign player connected with a wired connection,
- Formatted SD card
- BSN.Cloud account

Firmware update (Mandatory).
Add a Player to Your Network
To add a player:
Log into BSN.Cloud
Select your Network
Go to Dashboard
Click Activate Player
Enter the Activation Code from the screen
Click Submit
The device is now added to your network and provision.
Create a Player Setup
To create a setup:
Log into BSN.Cloud
Select your Network
Go to Admin > Setup Library
Click New Player Setup
Configure the following:
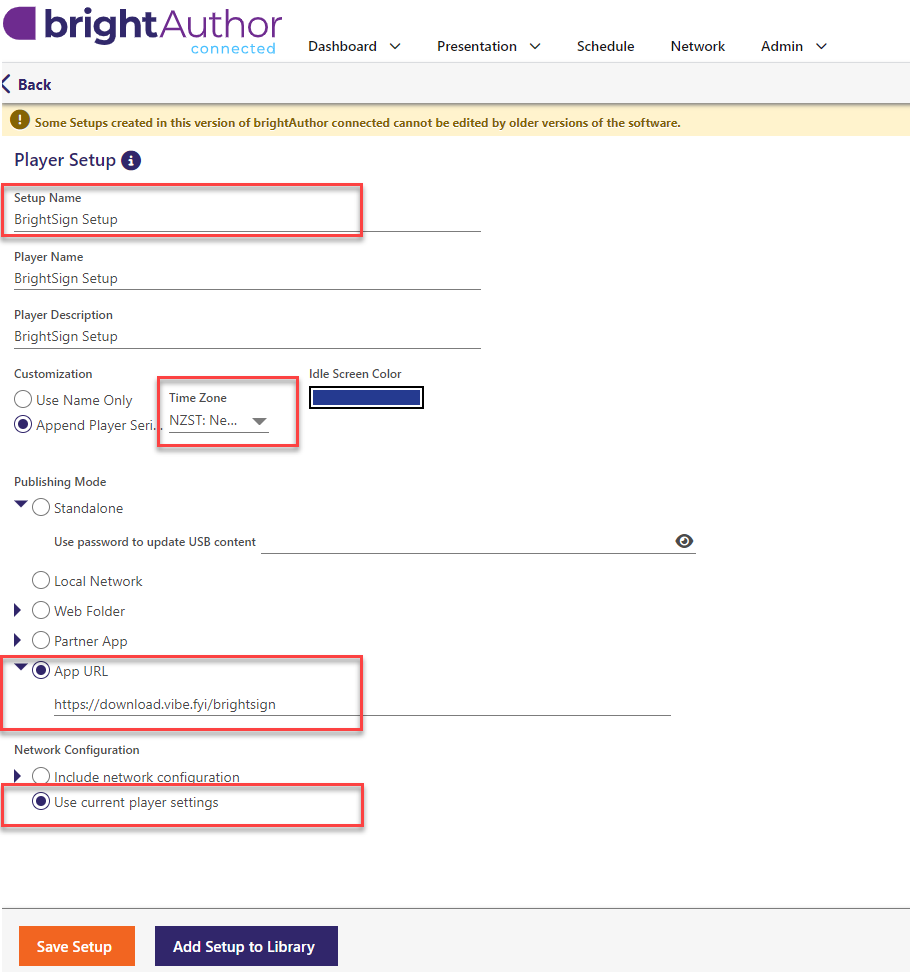
Setup Name
Give the setup a clear Setup Name.
Time Zone
Set the correct timezone for the player. If you operate across time zones, append the timezone (e.g., Auckland-NZST)
Publishing Mode
Select App URL
Enter the Vibe BrightSign setup URL.
Network Configuration
Select Use Current Player Settings (Ethernet connection)
Required Player Settings
Ensure the following are enabled:
Enable Local Diagnostic Web Server
Set a secure password (must include uppercase, lowercase, and special characters)
Store this password securely — it is required for local IP control
Enable Remote Screenshot
- Enable bsn.Control or bsn.Content
Click Add Setup to Library to save.
Apply the Setup to a Player
To assign the setup:
Go to Admin > Provision
Tick the player(s)
Click Apply Setup
Select the setup from the drop down
Click Apply Setup
Reprovision the Player (Critical Step)
Applying the setup alone is not enough. you must Reprovision he device:
To reprovision the device:
Log into BSN.Cloud
Select your Network
Click Network
Locate the player
Click the ⚙️ (cog icon)
Go to the Control tab
Click Reprovision
This will:
Wipe the SD card
Apply the setup
Install the Vibe app
At this stage, the app is installed — but not yet syncing.
Add Sync Settings to the Player
To connect the player to your Vibe site, you must upload a sync configuration file.
Create the settings.xml File
On your PC, create a new file named:
settings.json
Add the following content:
Replace:
example.vibe.fyiwith your Vibe domain11111111with the player’s auth code
Upload the File to the Player
Log into BSN.Cloud
Select your Network
Click Network
Click the ⚙️ (cog icon) on the player
Go to the SD tab
Navigate to
/sd/vibeClick Browse
Select your
settings.jsonfile and click Upload Files

Reboot the Player
Go to the Control tab
Click Reboot
The player will restart and begin syncing to your Vibe site.
Factory Reset
Factory Reset the Device
To perform a factory reset:
Log into BSN.Cloud
Select your Network
Click Network
Locate the player
Click the ⚙️ (cog icon) to manage the player
Go to the Control tab
Under Factory Reset, click Reset
This will:
Wipe the player configuration
Remove installed applications
Return the device to default state
Re-format the SD Card
After the factory reset:
Remove the SD card from the player
Insert it into your computer
Format the SD card using exFAT file system

Remove the Device from Your Network
You must remove the player from your BSN.Cloud network to fully release it.
Remove from Provision List
Log into BSN.Cloud
Select your Network
Go to Admin > Provision
Locate the player
Click Delete
Remove from Network List
Click Network
Locate the same player
Click Delete
This ensures:
The device is no longer associated with your organisation
It can be added to a new network in the future
FAQ
- Please make sure the Authcode that you entered in the settings.json is correct
- Make sure you have the updated firmware version from https://www.brightsign.biz/resources/software-downloads