Install Guide - LG WebOS 3.2+
Read First
Pre-Install tips
- Read the Install Checklist (including hardware & network requirements)
- To save time, use a Wireless (USB) Keyboard & Mouse
- Contact your Vibe administrator or Vibe Support team if you have not received the site URL and auth code(s).
 Please make sure you have Lg remote with you. To buy a new one please refer to this link
LG supported models
If you have purchased one of the following supported LG digital signage models, please use the setup steps below:
- webOS 6.0 - UH5, SM5J, UL3J series
- webOS 4.1 - UH5F, UM3F series
- webOS 4.0 - SM5KE Series
- webOS 3.2 / WebOS 3+ - SM5KD Series
- LG Physical Media Players - WP400 (WebOS 4.0), WP402 (WebOS 4.2) & WP600 (WebOS 6.0)
For LG Commercial screens
- Remove the badge from the base of the screen (Screwdriver required)
- For Portrait screen (Latest model) - The screen should be orientated Right Side Down (rotate clockwise)
- Using the LG remote, power the screen on and open the LG menu/settings.
In the settings, activate the following: - Network (choose one of the options below):
- Fixed - Plug the ethernet cable in (recommended)
- WiFi - Open General > Network and connect to a strong WIFI network
- 3G/4G - Plug your USB dongle with an active sim card into an available USB portal
NB: When using a USB device, open the LG Admin settings (try 4 or 5 zeros to access) and enable the USB lock option. - *Date/Time* - Open General > Date & Time and
- Set the correct timezone (e.g. Oceania > New Zealand > Auckland)
- Turn the Set Automatically' setting on
- Optional - Change White Balance to Mall/QSR
- Power Settings - Open General > Power > Brightness > AUTO (High Bright Screens only)
- Optional - You also have the option of adding an on/off schedule using the LG system settings. You will need the LG remote to perform this update.
- Push the settings button on the remote
- Locate and select the On/Off scheduler in the EZ Settings menu
- Set your timers as needed
e.g. for daily restarts we recommend setting a 3am off timer and 3.05am on timer

The date and time Should be properly set according to the location of the installation or dynamic contents and the Screen ON/OFF timer will not work as it is supposed to be
For LG Digital Signage WebOS box
- Remove from packaging and connect;
- The power cable
- HDMI cable to the HDMI port and to the HDMI 1 port on the display
- Remote sensor to the IR IN port
- LAN cable (if not using WiFi)
- Using the LG remote, power the screen on and open the LG menu/settings.
- In the settings, activate the following:
- Network:
- Fixed - Plug the ethernet cable in (recommended)
- WiFi - Open General > Network and connect to a strong WIFI network
- 3G/4G - Plug your USB dongle with an active sim card into an available USB portal
NB: When using a USB device, open the LG Admin settings (try 4 or 5 zeros to access) and enable the USB lock option. - *Date/Time* - Open General > Date & Time and
- Set the correct timezone for your current screen location
E.G. for screens located in New Zealand set to Oceania, New Zealand, Auckland - Turn the Set Automatically' setting on

The date and time Should be properly set according to the location of the installation or dynamic contents and the Screen ON/OFF timer will not work as it is supposed to be
Download the Vibe.fyi player app

Before you proceed with the install steps below:
1) Read the Install Checklist - Hardware & Network Requirements
1) Read the Install Checklist - Hardware & Network Requirements
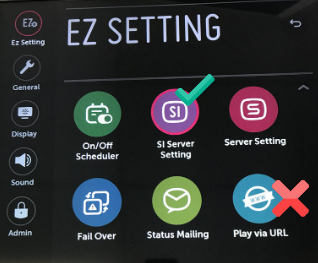
4) Disable the Play via URL setting

To setup your workplace digital signage, download and install the Vibe.fyi player app on your LG SoC commercial display or media player.
- Press the Settings (
) button on the LG remote
- In the menu, open Ez Settings and select SI Server Setting
- In the SI Server Setting page, apply the following settings to download the Vibe.fyi player app:
Fully Qualified Domain Name - Select ON and enter the WEBOS IPK URL download URL:
https://download.vibe.fyi/webos/app.ipk?[your site]&[Authcode]
(You should be able to get WEBOS IPK URL from the Admin console. See article) Make sure there no blank spaces in the Site URL and Auth codeNB: If you are sent a custom Download URL use that instead
- Application Launch Mode - Select Local
- File or Application Type - Select IPK
- Local Application Upgrade - Select Remote
- Select Confirm
- After a successful download/install, select OK
- Use the LG remote to restart the TV (power off, then on).

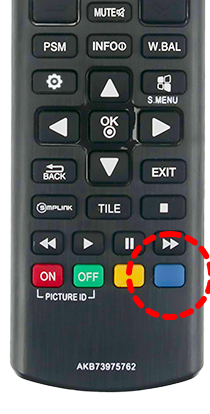
Press the BLUE button on the remote to check the logs to see if slides downloaded successfully.
(If you are using a keyboard please click the F2 to access logs(Blue button) F4 to access vibe settings(Yellow button))

(If you are using a keyboard please click the F2 to access logs(Blue button) F4 to access vibe settings(Yellow button))
If you need to update the firmware or App version Click on the Advanced Commands and select the necessary option
Alternative install: Use a USB storage device
Create a new folder on your USB drive:
- Plug the USB flash drive into a USB port on your computer and create an Application folder
- Download the latest app version from https://download.vibe.fyi/webos/app.ipk
- When the download is complete, eject your USB flash drive
- Next,
- Insert the USB device into the USB port on your LG WebOS screen
- Using the remote, power the display on and open EZSettings > SI Server Settings
- Set Application Launch mode to Local
- Set Application Type to IPK
- Set Location Application Upgrade to USB
- Select [Confirm] to start the install
- When the installation is complete, use the remote to power the screen off then on and wait a few seconds for the app to launc
Announcements
Did You Know? You Can Use Custom Feeds (RSS) in Vibe Templates!
It’s not new — but it’s one of Vibe’s most underused superpowers! With Custom Feeds (RSS), you can automatically pull live content — such as news, blogs, or job listings — straight from external websites into your Vibe templates. Just choose a templateSlide Settings Update: Smarter Advanced Scheduling
We’ve completely re-developed Vibe's Advanced Scheduling feature to make it simpler, clearer, and more powerful. No more confusion around start/end dates and times or setting up repeats on specific days — the new UI makes it intuitive to plan and controlAvailable Now: Sports Tournament Infotainment
Get ready for the Women’s Rugby World Cup! We’ve updated our Sports Tournament Infotainment slide with fixtures and live leaderboard updates. Perfect for keeping your workplace in the spirit of the game. You'll find it in the Infotainment Category whenTemplate Design Guide
Our Template Design Guide is for external designers, we recommend reviewing it if you plan to design your own Vibe templates: 👉 Vibe Template Design Guide This guide is designed to support brand and design teams in preparing template briefs—not buildingComing Soon: New Look for System Settings
Behind the scenes, our team has been busy building a new System Settings interface in the Portal. This refreshed design will make managing Vibe smoother, faster, and more intuitive. Over time, we’ll be migrating all administration features and settings