Social Media
Extend the reach of your company's social media activity to your workforce and invite staff to generate content on screen.
Videos: Template Tour
Social (Classic)
Transform your digital signage screen with a timeless wallpaper mashup that showcases your Social Media content in real-time. This visually engaging template from Vibe.fyi focuses on putting images first, creating a dynamic and eye-catching display. Perfect for workplace digital signage, corporate events, or conference video walls, it brings an immersive and unforgettable experience to any environment.
Social (Expanded)
Transform corporate events and conference spaces with Vibe.fyi's dynamic Social Media Expanded template. Seamlessly integrate live social feeds to promote brand awareness and engage audiences in real-time. Take your brand’s presence to the next level with stunning visual mashups that capture the energy of social media.
Social (Full Screen)
The Social Media Full Screen Style slide allows you to seamlessly display dynamic content from social media platforms within Vibe.fyi. This template offers internal communication specialists an effortless way to keep teams informed with up-to-date posts, eliminating the need for time-consuming content curation. Stay connected and share the latest buzz without the hassle of manual updates.
Social (Panoramic)
Harness the full potential of Vibe.fyi's Social Panoramic Style template to amplify your brands impact. This engaging format seamlessly integrates live, interactive social media streams into your digital signage, ensuring captivating content for workplace displays, corporate events, or conference video walls. Elevate your audiences experience with vibrant, real-time updates that keep them connected and engaged.
Social (Sequential)
Showcase real-time social media content across your workplace digital signage with Vibe.fyi’s Social Sequential template. Improve corporate events and internal communications by blending curated social media posts into your messaging. Make your brand stand out and create a lasting impression on employees and guests alike.
Social (Solo)
Content Source
Once you have created your slide using the Social Media template, choose a content source to start adding your content:
Content Stream - Social Media

Prerequisite: Authenticate your social media accounts and create your feed(s) before creating your Social Media slide.
- In the Content Source dropdown, select Content Stream - Social Media to show Facebook feed
- Choose your Content Stream (or feed)
Content Stream - Viva Engage
Prerequisite: Connect your Viva Engage groups to Vibe.fyi before creating your Social Media slide.- In the Content Source dropdown, select Content Stream - Viva Engage
- Select your Viva Engage group (or community) in the Content Stream - Viva Engage dropdown. You can show all posts or select a topic within a community.

Tailor your Viva Engage feed by adding topics to new or existing posts.

To replace the default images used for text only posts and polls, create new graphics @ 703 w x 244 h px (JPG, 72dpi) and send them to your Vibe Support team to upload.
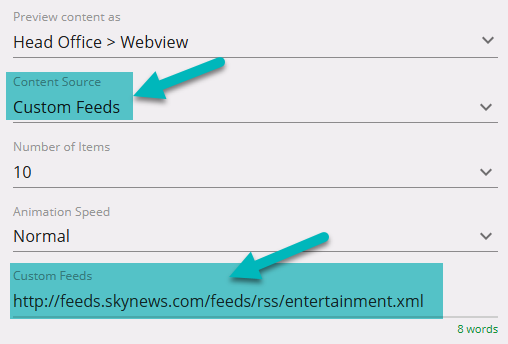
Custom Feeds
- In the Content Source dropdown, select Custom Feeds
- Paste the RSS Feed URL in the Custom Feeds field
- In the Content Source dropdown, select Custom Feeds
- Paste the RSS Feed URL in the Custom Feeds field
Web Portal
- In the Content Source dropdown, select Web Portal
- To add content,
- Click [Add Content] to upload images via the content editor and click [Save]
OR - Drag-and-drop one or more images via the Upload field
- Repeat steps a and/or b to add more content
- When you are ready to go live, add your Social media slide to one or more playlists.
File Upload (XLSX)
- In the Content Source dropdown, select File Upload (XLSX)
- Download the Social Media data template
- Use the data template (XLSX file) to add your posts (one row per post)
- Save your XLSX file locally and upload the saved file into the slide editor
- When you are ready to go live, add your Social media slide to one or more playlists.
Google Sheets
Follow the prerequisite steps to set up your integration and get started with Google Sheets seamlessly.
- Vibe Portal - Download the VIBE-DATA-TEMPLATE_SocialMedia.xlsx
- Google Drive - Upload the VIBE-DATA-TEMPLATE_A.xlsx to your connected Google Drive folder and add your data
- Vibe Portal - Choose Google Sheets in the Content Source dropdown and select your saved Google Spreadsheet
Recommended Reading: Prep your Google SheetsSharePoint (XLSX)
Follow the prerequisite steps to set up your integration and get started with using SharePoint Folders to store your Excel files.
- Vibe Portal - Download the VIBE-DATA-TEMPLATE_SocialMedia.xlsx
- SharePoint - Upload the VIBE-DATA-TEMPLATE_SocialMedia.xlsx to your connected SharePoint folder and add your data
- Vibe Portal - In the slide editor, choose SharePoint (XLSX) in the Content Source dropdown and select your saved Excel file.
QR Code
This QR code directs you to the original slide deck shared on Viva Engage. Scan to review the presentation, access speaker notes, and participate in the discussion with your insights and questions.
To enable QR Code in your slide:
- Under the Design tab, open the Elements panel.
- Toggle the QR Code option to display the QR code on your slide.
- (Optional) Customize the QR code:
- Use the background color picker to change the QR code background.
- Use the border color picker to adjust the border color around the QR code.
Tips:
- Ensure there’s enough contrast between the QR code and its background for easy scanning.
- Test the QR code with a scanner after any color changes to confirm readability.
The QR code feature is currently applicable only to the Social Solo templates and the Social Fullscreen templates.
XLSX Data Template
If you have selected 'File Upload (XLSX)', 'Google Sheets' or 'SharePoint (XLSX)' as your content source, use this section as a guide for formatting the data in your spreadsheet.
Supported Data Formats
| Data Column | Supported Formatting |
| PostedDateTime (optional) | [DD/MM/YYYY or MM/DD/YYYY] HH:MM (24hr) |
| Summary | Free format. Bold, Underline and bullet or number list formatting is supported. |
| Author | Free format. Bold and Underline formatting is supported |
| Image | Valid web URL (e.g. image:https://demo.vibe.fyi/Images/logo.png) |
| PinToTop (optional) | Yes or No |
Recommended Reading:
Common Data Entry Formats (for more information on managing your data)
Design
- Slide Title - Elevate your slide title by selecting the perfect background color! Use our intuitive color picker to experiment with various shades and hues that complement your content. A well-chosen background not only enhances readability but also sets the tone for your presentation. Whether you’re aiming for a bold statement or a subtle aesthetic, find the ideal color that captures your audience’s attention and underscores the importance of your message!
- Date - Take control of your presentation's timeline with our convenient date toggle functionality! Easily show or hide the date on your slides to suit your needs. Whether you want to keep your presentation timeless or provide context for a specific event, this feature allows you to customize the visibility of the date with a simple toggle switch.
- Shape - Transform your slide's visual appeal by selecting your posts shape background color with our easy-to-use color picker! Bring your content to life by choosing shades that reflect your brand’s personality or the mood you want to convey. With a wide spectrum of colors at your fingertips, you can create a striking contrast that makes your text stand out and captures your audience's attention.
- Slide Title
- Layout - Enhance the impact of your presentation with our customizable slide title layout styles! Choose from a range of options, including elegant panels and eye-catching graphics, to ensure your title stands out.
- Graphic -Bring your presentation to life with dynamic transitions for graphic shapes! Our intuitive features allow you to effortlessly align and reposition shapes, creating smooth visual movements that capture attention
Learn more about our template Slide Design Options (Text | Elements | Themes) including backgrounds and logos.